Quick Answer
What is Meta Advantage Plus Creative? It is a set of AI-powered tools inside Meta Ads Manager that automatically adjust your ad creative to try to improve performance. When it is on, Meta can tweak your images, videos, and text, adapt them to different placements, and test variations to show each viewer the version it predicts will work best for them. Meta writes it as Advantage+ creative.
Should I turn on Advantage Plus Creative in Meta ads? For most beginners running direct response campaigns, it is reasonable to leave it on, but only after you preview what Meta will actually do and turn off any changes that do not fit your brand. Keep it off when your branding is strict, when you are running a clean creative test, or when the previews distort your product or message. It is a helpful assistant, not a fix for weak ads.
That is the short version. The rest of this guide explains how it works, when to use it, when to avoid it, and how to keep control, with practical examples for real businesses.
What Meta Advantage Plus Creative Is
Advantage Plus Creative is Meta’s collection of automatic, AI-assisted adjustments that sit at the ad level in Ads Manager. You give Meta your assets, your images, your video, your headlines, and your main text, and the system can modify and combine them, then deliver the version it thinks will perform best for each person who sees the ad.
It is part of a wider family of Advantage features. Advantage Plus audience and Advantage Plus placements deal with who sees your ad and where. Advantage Plus Creative deals with the ad itself, the actual thing people look at. It is worth keeping these separate in your head because turning one on does not turn the others on.
The simplest way to think about it is this. You are still the one who supplies the offer, the product, the photos, and the message. Meta is the assistant that tidies, adapts, and tests those inputs across its placements. If your inputs are weak, the assistant cannot save them.
How It Works in Simple Words
You provide the raw materials. Meta’s system then creates variations of your ad and uses machine learning to match the right version to the right viewer at the moment the ad is shown. This happens at delivery time, which means the version one person sees can differ from what another person sees.
Two ideas help here. First, Meta is trying to personalize. It predicts which crop, which background, which headline, or which format is most likely to get a response from a particular person, and it shows that one. Second, Meta learns as the campaign runs. After you launch or after you make a significant edit, the system needs time to settle, often around a week. During that learning period, results can be unstable, and big edits can reset the clock. This is why judging performance on the first day or two is a mistake.
You are not flying blind. Meta lets you preview many of the changes before the ad goes live, and you can switch individual enhancements off. That preview step is the single most useful habit a beginner can build.
What Changes Meta May Apply
The exact options shift over time, and Meta updates them often, so always check the current list in Ads Manager. In general, the changes fall into a few groups.
For images, Meta may adjust brightness and contrast, apply small visual touch-ups, crop or reframe the image for different placements, expand the image to fill a different aspect ratio, add simple animation to a static photo, or place your image inside a template.
For videos, Meta may trim or adapt the clip for vertical placements, add music, or adjust the format so one video fits Feed, Reels, and Stories.
For text, Meta may create variations of your primary text and headline, reposition text, or suggest new wording based on what you provided.
For placements, Meta adapts a single asset so it renders across many spots without you manually making one version per placement.
A useful note from Meta’s own help material is that any single example, such as a brightness adjustment, is only one of many possible changes. So do not assume you know everything it will do. Preview it.

Standard Enhancements vs Generative AI Enhancements
This is the distinction that matters most for brand control, and many beginners miss it.
Some enhancements are standard. They only modify, crop, or supplement what you already gave Meta. A brightness tweak or a placement crop does not invent anything new.
Other enhancements use generative AI. These can create content that was never in your original asset, such as an expanded background that the AI fills in, or new text variations. In Ads Manager, generative AI enhancements are usually marked with an AI label.
Why does this matter? Because a generated background or a generated line of text can change how your product or message looks in ways you did not approve. For a plain product photo, that might be fine. For a regulated service, a personal brand, or a product where exact colour matters, it can be a real problem. Knowing which enhancements are standard and which are generative lets you keep the safe ones and switch off the risky ones.
A practical 2026 note: Meta has been tightening its rules around disclosing AI-generated or AI-modified content, and undisclosed AI content has become a more common reason for ads being rejected. Check the current policy and your disclosure settings before you launch, especially if your base asset is itself AI-generated.
Why Meta Uses Creative Automation
Meta has a lot of placements, and most of its traffic is on mobile, much of it vertical video. Manually building a perfect version of every ad for every placement and every audience is slow and expensive, especially for a small business.
Meta’s ad system also now tests a very large number of ad variations in parallel, and creative diversity has become a bigger lever for performance than fine-grained audience targeting used to be. Automation is how Meta scales that testing. From Meta’s point of view, giving the system more creative inputs and more freedom to adapt them helps it find what works faster.
That is the honest reason it exists. It is built to serve Meta’s delivery system as much as your campaign, which is exactly why you should use it with your eyes open rather than trusting it blindly.
Why Beginners See This Option Turned On
If you opened a new campaign recently and found Advantage Plus Creative already enabled, you are not imagining it. Meta has moved toward turning these enhancements on by default for many new campaigns, particularly in direct response objectives like Sales and Leads.
For a beginner, this has two effects. The good thing is that you get adaptation and testing without extra work. The risky one is that your ad may be modified in ways you never reviewed. The answer is not to panic and turn everything off. The answer is to open the preview, see what Meta plans to do, and make a deliberate choice on each enhancement.
When to Turn It On and When to Keep It Off
Should beginners turn on Advantage Plus Creative? In most direct response cases, yes, with supervision. Turn it on, preview the changes, switch off anything that distorts your brand or product, then give it a fair testing window. It earns its place when you have limited creative resources and want help adapting one asset across placements.
Turn it on when you have a few creatives and need coverage across placements, when your goal is direct response, such as sales or leads, when you have previewed the changes, and they look accurate and on brand, and when you can give the campaign about a week before judging it.
Keep it off when your brand guidelines are strict and every visual detail matters, when you are in a regulated field where wording and claims are sensitive, when you are running a controlled creative test and need a clean comparison, when the previews crop out your logo or product or look low quality, or when exact product colour and detail are critical and image expansion risks distorting them.
How It Affects Images, Videos, Text, and Placements
For images, the upside is reaching across placements from one asset and small visual lifts. The risk is that expansion or heavy cropping changes the composition, hides key elements, or alters the look of your product.
For videos, the upside is automatic adaptation to vertical formats and added music that can lift engagement. The risk is that the wrong music or an awkward trim changes the feel of your message.
For text, the upside is quick variation testing. The risk is that a generated headline overstates your offer, sounds off-brand, or introduces a claim you cannot back up.
For placements, the upside is that you stop hand-building a version for every spot. The risk is that a design made for Feed looks wrong in Reels or Stories if you did not keep key content centred in a safe zone.
A simple design habit reduces most of these risks. Keep your important text, logo, and product near the centre of the frame so that when Meta crops or reframes for a placement, the essential part survives.
How It Affects Branding
This is where caution pays off. Standard adjustments rarely cause brand problems. Generative changes can. A generated background might clash with your identity, a generated headline might use a tone you would never choose, and an expanded image might place your product in a setting that misrepresents it.
You have controls. Preview before launch, switch off generative enhancements you do not want, and use the Restricted Words setting to tell Meta which words it should not use in generated text. If your brand is your face, as it is for many coaches and personal brands, be especially careful with anything that alters your own image.
How It Affects Small Budgets, Lead Generation, and Ecommerce
On small budgets, you have little room for noise. Enhancements can help you get more mileage from a single asset across placements, which is genuinely useful when you cannot afford a big creative library. The trade-off is that automatic changes make results harder to read, so keep the changes simple, avoid the riskier generative ones at first, and give the campaign enough time before deciding anything.
For lead generation, enhancements can change how your offer is framed and presented. More volume is not the goal. The goal is qualified leads. If a flashier, auto-adjusted ad pulls in people who tapped on impulse, your cost per lead might look great while your lead quality quietly drops. Watch what happens after the form is submitted, not just the cost on the dashboard.
For ecommerce, image expansion and background changes can either help or hurt. They help by giving you placement coverage. They hurt when an expanded background looks unrealistic or a colour shift makes the product look different from what arrives in the box, which can drive returns and complaints. Accuracy protects you here more than polish.
How to Test It Safely
Preview first, always. Open the edit view next to Advantage Plus Creative in Ads Manager and look at the carousel showing your original next to each possible change. Turn off anything that looks wrong.
Change one thing at a time. If you flip several settings at once, you will never know which one moved the result. Give the campaign about a week to get through the learning period before you read too much into the numbers, and avoid making constant edits that reset that learning.
Use the breakdown and asset reporting to see which combinations Meta is favouring. When you find a winner, you can recreate that style as a clean manual ad and scale it deliberately.
How to Review Performance After Turning It On
Do not judge in the first couple of days. Early numbers during learning are noisy.
Look at the full funnel, not just the top. Click-through rate and cost per click tell you about attention. Conversions, lead quality, return on ad spend, and returns or refunds tell you about the money. A cheap click that never converts is not a win.
Watch your fatigue signals too. If your cost to reach people keeps climbing and frequency rises, the system may be running out of fresh viewers for your current creative, which means it is time to refresh, not to blame the enhancements.
How to Avoid Poor Quality Leads
Poor lead quality is the most common complaint when automation is involved, so plan for it.
Use higher intent lead form types and verification options where available, such as steps that confirm a phone number or ask for a work email, which filter out some low effort submissions. Add a qualifying question or two so casual taps drop off before they become a lead. Exclude audiences that are clearly irrelevant. Most importantly, track what happens to leads after capture. If your CRM shows that the contact rate or the booked meeting rate falls after you turned enhancements on, that is your signal to tighten the form or rein in the creative changes.
How to Avoid Brand Mismatch
Preview every enhancement before launch. Switch off generative background and text generation if your brand is sensitive. Set Restricted Words so Meta avoids language you do not want. Disable image expansion if it crops your logo or distorts your product. Keep key visuals centred so placement crops do not cut them off. These few habits prevent almost every brand-mismatch problem beginners run into.
How to Use It With Manual Creative Testing
Here is a rule worth remembering. Do not run Advantage Plus Creative enhancements during a pure manual creative test. If you are trying to compare two creatives head-to-head, and Meta is modifying them mid-flight, you cannot trust the comparison, because you are no longer testing your two versions; you are testing whatever Meta decided to show.
A clean approach is to keep control. Run one ad with enhancements off as your honest baseline, and run the enhanced version separately. That way, you can see whether the automation actually helped, rather than assuming it did. Use the winners from your manual tests as strong inputs, then let enhancements adapt those proven assets across placements.
Five Real World Examples
Local Dentist Example
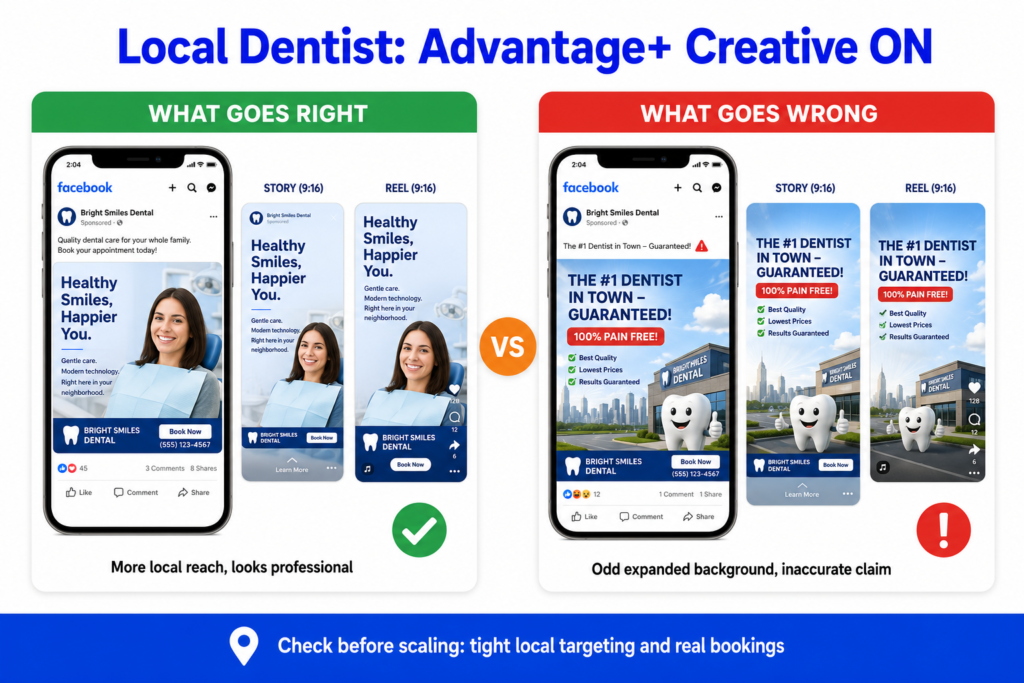
What the advertiser wants: more new patient bookings and calls from people in the local area.
What happens when it is on: Meta adapts a single clinic photo or short clip across Feed, Reels, and Stories, may brighten the image, and may test headline variations.
What can go right: the practice gets a wider local reach from one asset without paying for many versions.
What can go wrong: image expansion adds an odd background, or a generated headline implies a service or price that the clinic did not state, which is risky for a health business.
What to check before scaling: the previews look professional and accurate, location targeting is tight, calls and bookings are actually coming in, and no enhancement introduces a misleading health claim.
Online Clothing Store Example

What the advertiser wants: more sales and a healthy return on ad spend.
What happens when it is on: Meta crops product images per placement, may expand backgrounds, tests headline variations, and may add music to a product video.
What can go right: more placement coverage and a clear winning combination to recreate manually.
What can go wrong: image expansion distorts a garment, a colour shift makes the product look different from reality, or a generated line overstates a discount, all of which can lead to returns and complaints.
What to check before scaling: the product looks accurate, colours are true to life, claims match the real offer, returns are not climbing, and the breakdown shows which combination won.
Real Estate Lead Generation Example
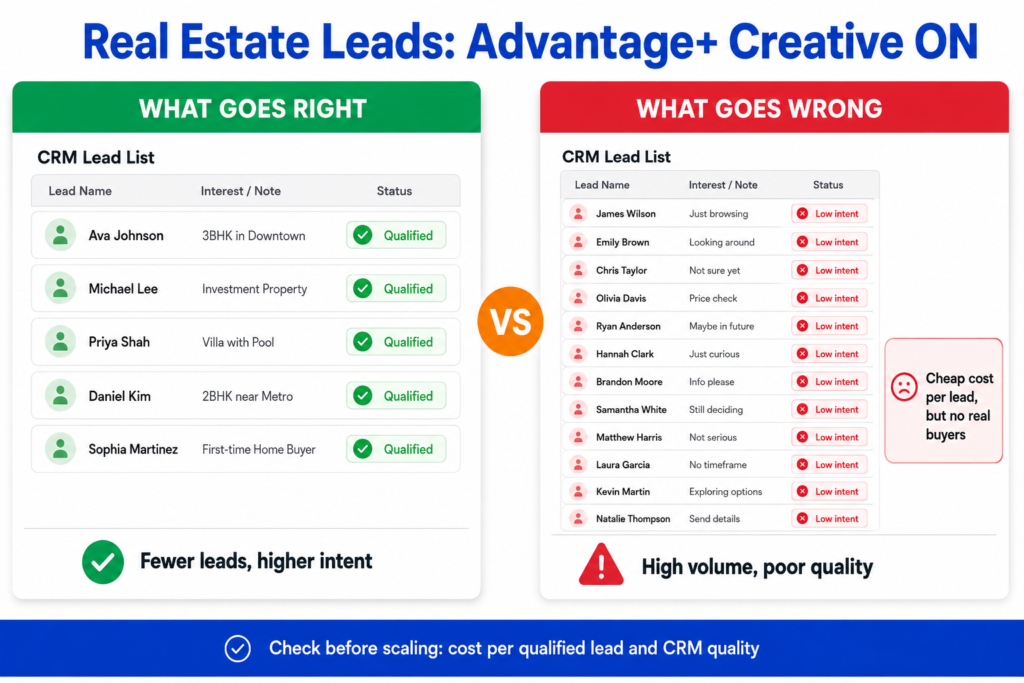
What the advertiser wants: enquiries from genuine buyers and sellers in a specific area.
What happens when it is on: Meta tests text variations that reframe the offer and adapts the ad across placements, often paired with an instant form.
What can go right: more lead volume from a small set of creatives.
What can go wrong: the ad attracts low-intent leads who tapped on a flashy auto-adjusted ad but are not serious, or the generated copy makes a promise the agent cannot keep, or the reach drifts outside the target area.
What to check before scaling: lead quality in the CRM, the rate at which leads turn into conversations, cost per qualified lead rather than cost per raw lead, and a form that includes qualifying questions or verification.
Fitness Coach Example
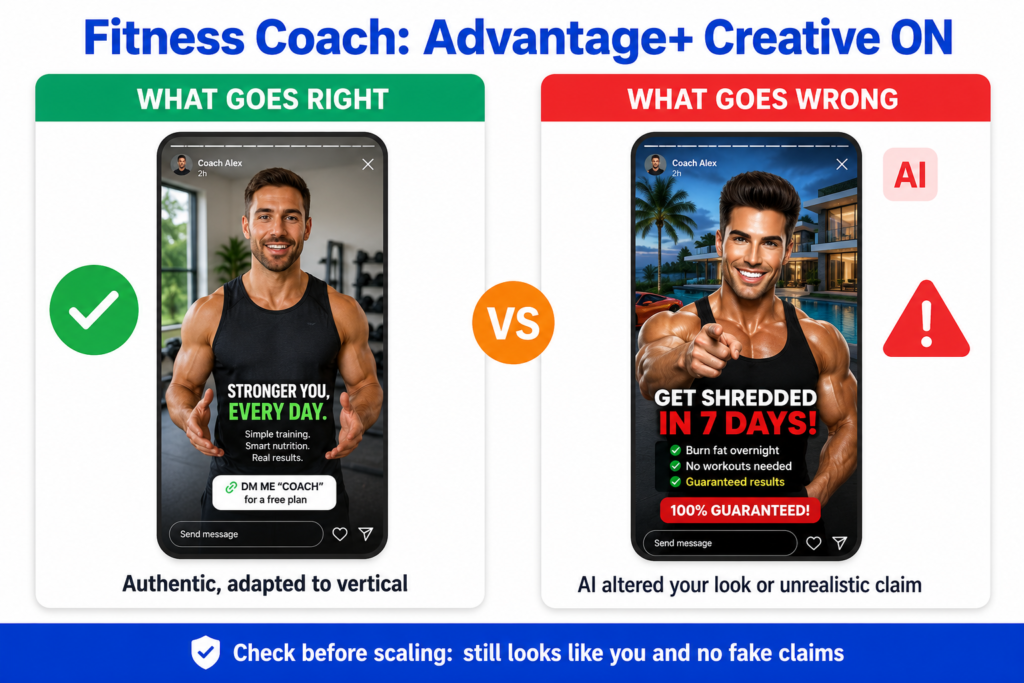
What the advertiser wants: sign-ups for a programme, while building a personal brand where the coach’s face is the brand.
What happens when it is on: enhancements may add music, brighten footage, or animate a clip, and generative options could alter the coach’s photo or background.
What can go right: a single phone filmed clip gets adapted into vertical formats cheaply and reaches more people.
What can go wrong: a generative change alters how the coach looks, or the setting they filmed in, which breaks authenticity, or generated text drifts into unrealistic body or result claims.
What to check before scaling: the coach still looks like themselves, no enhancement introduces an unrealistic promise, and engagement is turning into actual sign-ups rather than just views.
B2B Service Business Example
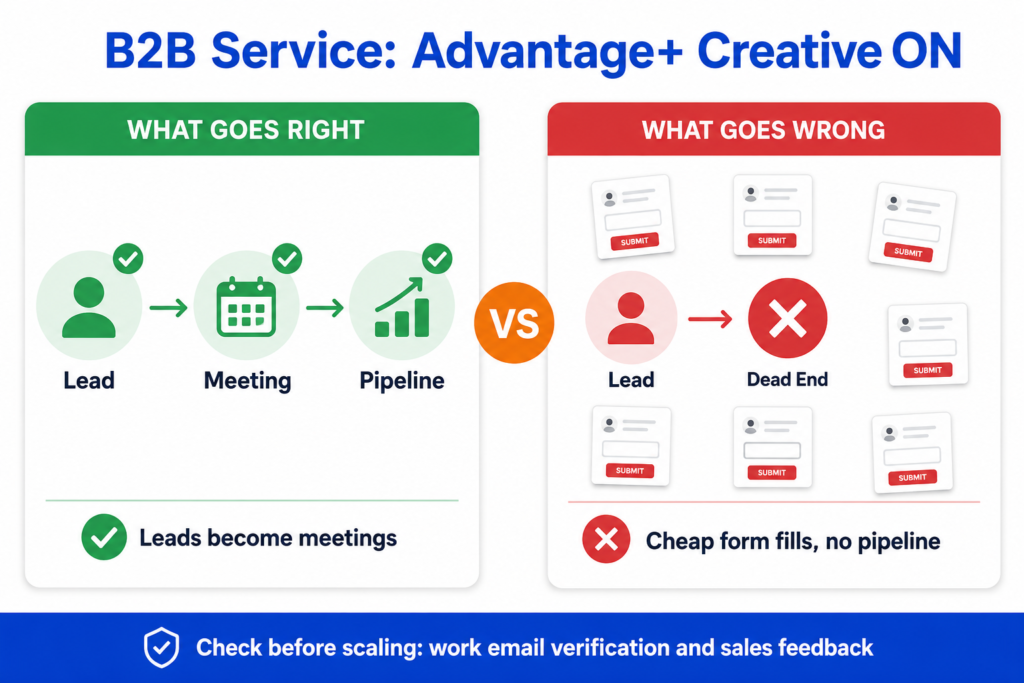
What the advertiser wants: qualified pipeline and meetings, not just cheap form fills, often with a longer sales cycle.
What happens when it is on: Meta tests text variations, adapts placements, and may apply generative text.
What can go right: lower cost per lead and broader reach from limited creative.
What can go wrong: the system optimizes toward cheap, low-quality form fills, the tone becomes too casual for a professional audience, or generated text misstates what the service actually does.
What to check before scaling: the rate at which leads become meetings or pipeline, work email verification to filter weak submissions, exclusions for irrelevant audiences, a tone that matches the brand, and direct feedback from the sales team on lead quality.
Practical Checklist Before Turning It On
- Brand control: I have previewed the changes and turned off anything off-brand.
- Creative quality: My base creative is already good, not something I expect Meta to rescue.
- Offer clarity: My offer is clear, and any claims are accurate.
- Landing page quality: The page the ad sends people to is fast, relevant, and works on mobile.
- Pixel and conversions tracking: My tracking is set up so I can measure real results, not just clicks.
- Lead quality plan: For lead campaigns, I have qualifying questions or verification in place.
- Budget size: My budget is realistic for the testing I want to do.
- Testing period: I will give the campaign about a week before judging it.
- Placement review: Key visuals are centred so placement crops do not cut them off.
- Reporting: I know where to check the breakdown to see which combinations are winning.
Common Mistakes Beginners Make
- Turning it on without checking the previews first.
- Using weak creative and expecting Meta to fix it.
- Ignoring landing page problems and blaming the ad.
- Judging results in the first day or two, during the learning period.
- Watching cost per lead while ignoring lead quality further down the funnel.
- Never compare the enhanced ad against a manual control.
- Leaving generative enhancements on when brand control is strict.
- Making constant edits that keep resetting the learning period.
Frequently Asked Questions
Conclusion
Meta Advantage Plus Creative is a useful assistant, not a magic switch. It can adapt your creative across placements, test variations, and save you manual work, which is genuinely valuable when you are starting out with a small creative library. What it cannot do is fix a weak offer, repair a poor landing page, or replace your judgement about your own brand.
So use it in a calm way. Preview what it plans to do, keep the changes that help, switch off the ones that do not fit, give it a fair testing window, and judge it on real results rather than early clicks. Do that, and the feature works for you instead of around you.
Official Resources
If you want to check the latest details yourself, these official resources are useful.
About Advantage+ Creative
Meta Business Help Center
This is Meta’s own explanation of what Advantage+ creative does and which creative enhancements are available. It is the best place to confirm current features because Meta updates its tools often.
Meta for Business
Meta’s main hub for advertiser guides, product updates, and best practices. It is useful if you want to understand the wider Advantage tools inside Meta Ads.
Meta Ads Manager
This is where you can preview creative enhancements, turn them on or off, and review how your ads are performing.
Meta Ad Library
A public library of ads running across Meta. It can help you see how different ad formats and creative styles appear in real campaigns.
Meta Advertising Standards
Meta’s official ad policy page. It is useful for checking what is allowed in ads before running or scaling campaigns.
Note: These resources are included because Advantage+ creative changes often. Official Meta pages are safer to rely on than random third party blogs that may become outdated